Key Points
- The vacuum infusion process allows precise control of resin and laminate compaction.
- The quality of the mold and vacuum level determines the success of the entire process.
- Core materials and perforations enable adhesion through “resin nails.”
- Consumables, peel ply, and vacuum bag are critical for stability and finish.
- Gelation time must always exceed the actual infusion time.
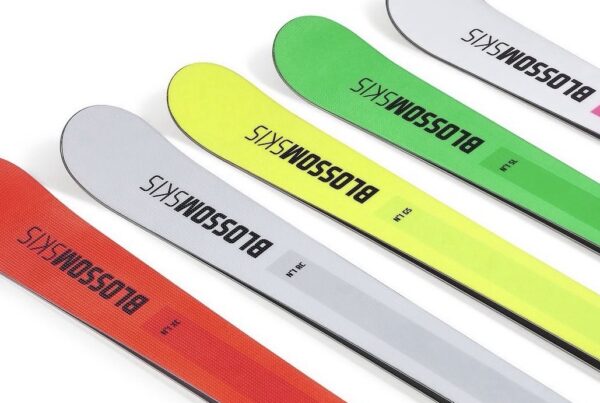
The production of fiberglass nautical in fiberglass, or more generally composite, historically originated with hand lay-up (wet lay-up) which consists ofimpregnating the fibers manually and then laying them on the mold.
This technique is still widely used today in boat building both for the production of solid laminate parts (single skin) and for the production of parts with sandwich structure, i.e., composed of two reinforcement skins with a lightweight core material in the center.
However, alternative methods for producing composite materials have been refined over time, involving a different methodology for production and therefore for combining the resin and reinforcements.
One of these is the infusion process.
Index
- What is the infusion process
- The mold for the infusion process
- Laying first skin fabrics (inner skin)
- Laying core materials in the infusion process
- Laying second skin fabrics (outer skin)
- Laying consumables in the infusion process
- Resin distribution and channel configuration
- Vacuum bag sealing and tacky tape
- Resin infusion and process control
- Process Completion and Laminate Curing
- Gelcoat and Skin Coat: Aesthetic and Structural Function
- From theory to practice: the Alba skiff case
- What are the applications of the vacuum infusion process?
- Mascherpa Integrated Solutions for Composite Materials
What is the infusion process
Theinfusion can be defined as a technique for producing composites that involves laying of reinforcement fibers on the dry mold, i.e., without resin, and subsequently applying resin to the mold by vacuum.
An area of lower pressure is created inside the mold, compared to the surrounding atmospheric pressure, capable of drawing the resin through flow channels that run from the resin storage containers (drums or other) to the mold.
This vacuum, commonly called “vacuum,” is achieved by covering the mold with a plastic film, commonly called “vacuum bag”, effectively sealed to the mold to prevent air infiltration.
From the area between the vacuum bag and the mold , air is evacuated using an electromechanical pump (vacuum pump); after this process the vacuum bag will adhere forcefully to the mold, compressing the fibers e creating the vacuum necessary to draw the resin.
Once the resin begins to flow into the mold, it must be able to cover the entire surface, impregnating all the fibers, in a time shorter than the catalyzation time. The resin, in fact, must remain in a liquid state throughout the infusion process to allow complete impregnation of all areas; only at this point can the resin catalyzation process begin, which then transitions to a solid state with an exothermic reaction.
In general, the resin flows from the storage containers (resin drums) to the mold through tubes appropriately sized and positioned. Once inside the mold, however, the resin must be able to flow easily, and therefore resin distribution methods must be planned, which vary depending on the type of infusion adopted.
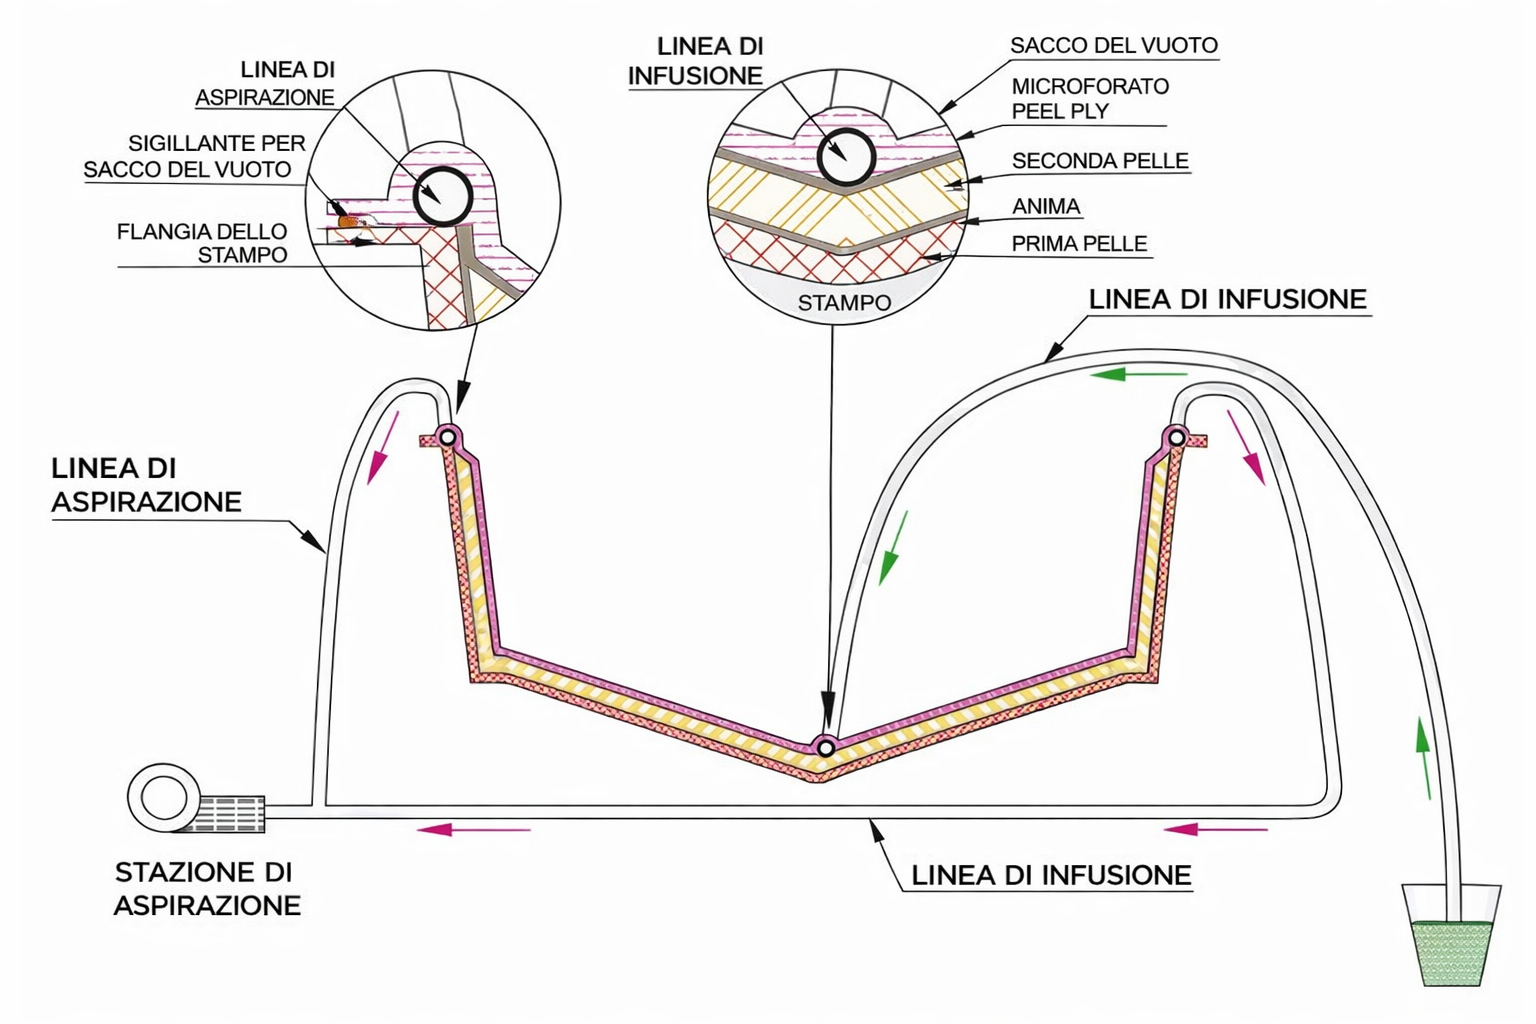
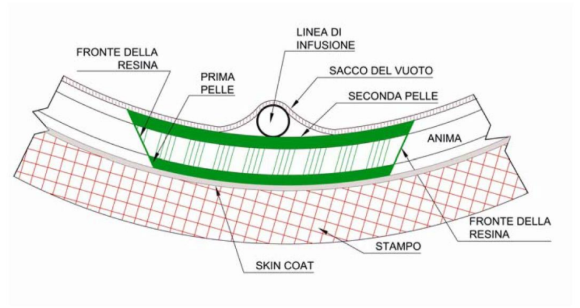
INFUSION PROCESS DIAGRAM
The mold for the infusion process
A mold suitable for the infusion process has particular characteristics, such as:
- High robustness to withstand the vacuum necessary for resin flow.
- A perimeter flange to seal the vacuum bag.
- The absence of air leaks, especially in the case of a mold consisting of multiple parts, which would render the attempt to create vacuum ineffective.
On the mold, after applying the release agent, the gelcoat will be applied (by spray or brush), GC, if necessary.
Very often, after the gelcoat, what is called the SKIN COATis created, a laminate normally laid up manually with mat (non-woven fabrics made with short-length – 5 cm fibers in fiberglass, randomly arranged and compacted with a powder or emulsion binder) first with very low weight (200 g), then increasingly higher (300 and 450 g).
The SKIN COAT is created to prevent the pressure created by the vacuum from “pushing” the fabric fibers to leave a mark on the gelcoat (Print-through phenomenon).
Laying first skin fabrics (inner skin)
A distinctive feature of infusion technology is the dry laying of fabrics, i.e., in the absence of resin, which will be added at the end of the process. The Laying the fabrics is therefore particularly simple because:
- their weight is reduced;
- they can be handled easily;
- cut;
- positioned and easily removed if necessary.
It is therefore possible to use fabrics with a weight per square meter greater than in the case of hand lay-up and consequently reduce the number of layers to be laid.
In the case of parts with complex geometries or areas with steep slopes, extreme attention must be paid to securing the fabrics, which once laid must be effectively held in position to prevent them from shifting or folding on themselves.
There are several methods to hold dry-laid fabrics in position; the most common is the use of spray adhesive consisting of elements compatible with the resin used. This category of solutions includes the products Infutac® and Saerfix® from the SAERTEX® range.
The infusion technique in general can be used both for the production of solid laminates (single skin) and for the production of sandwich laminates, i.e., consisting of two fiber skins with an interposed lightweight core material.
It should be noted, however, that due to the particular construction method represented by the infusion process, the thickness of laminates is significantly reduced compared to hand lay-up; it is therefore advisable to limit the use of solid laminate to localized areas to avoid instability phenomena.
Laying core materials in the infusion process
The panels that constitute thecore, also called core materials, are made of lightweight material, for example PVC, PET, SAERFOAM, and generally serve to space the inner skin from the outer one, increasing the section modulus of the laminate.
The cores that can be used with the infusion method have particular characteristics that are briefly listed here:
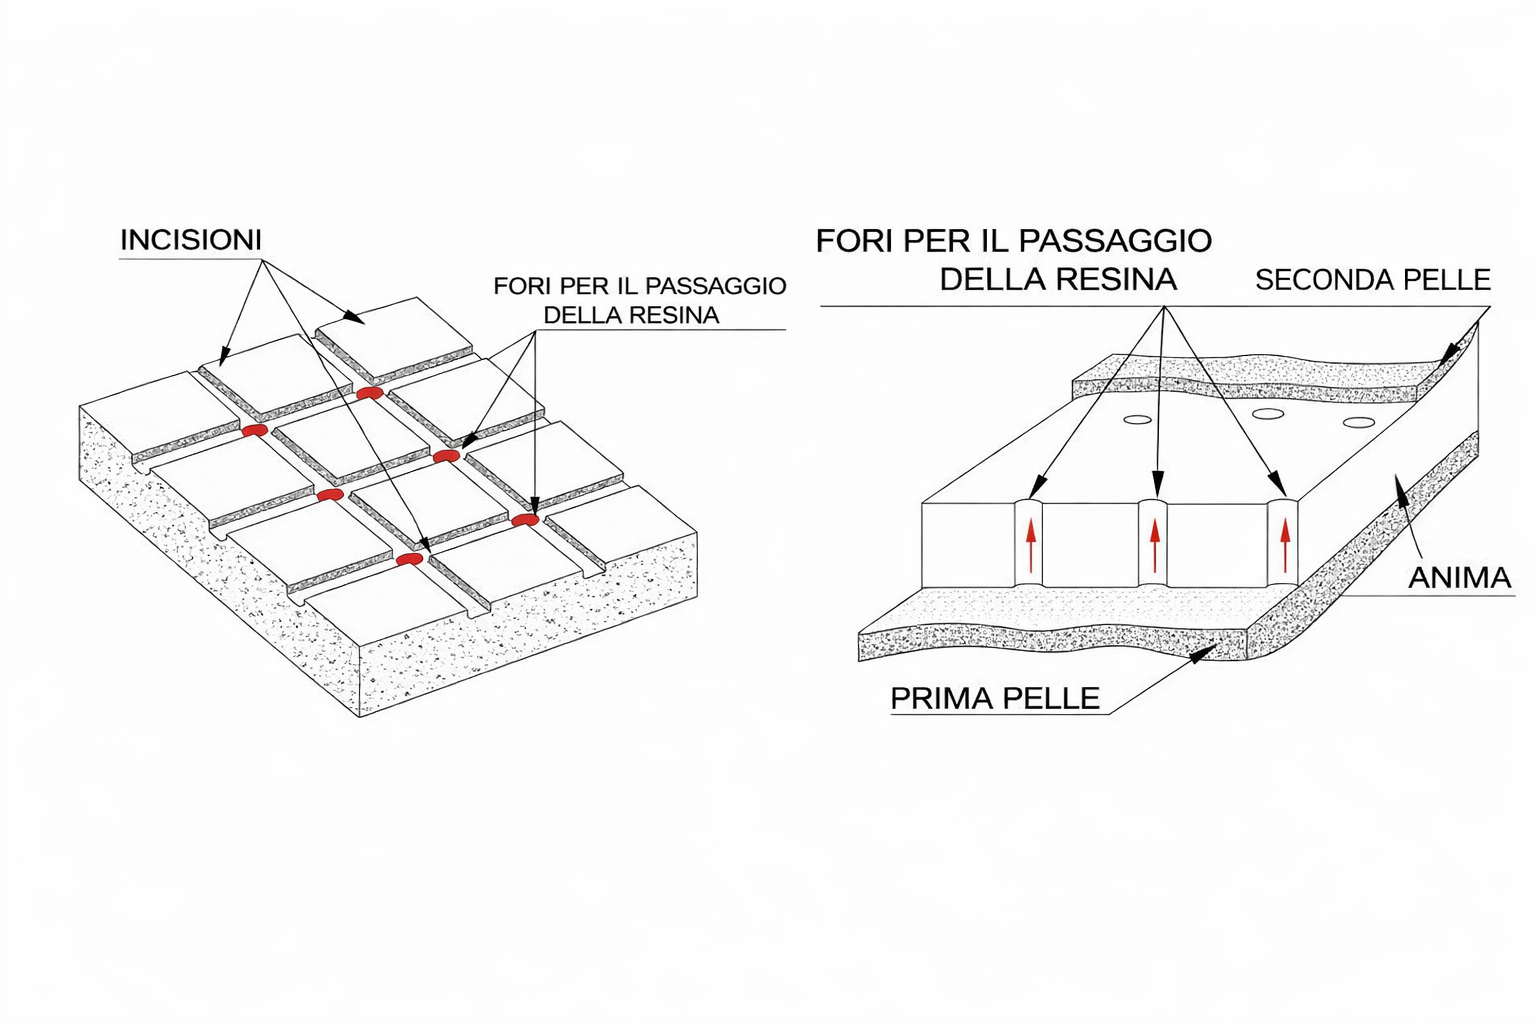
- The core must allow the flow of resin along the two faces (grooving).
- The core must allow the passage of resin from one face to the other (perforation).
- In the case of particularly concave or convex molds, it is necessary to ensure that the cores adhere perfectly to the laminate, possibly preforming them.
- The different panels that constitute the core must be carefully shaped to avoid leaving empty spaces along the edges that would lead to resin accumulation.
- The material constituting the core must be compatible with the resin used to prevent chemical reactions that could damage it.
Unlike other processes, in infusion, the core is not bonded to the skins but is simply placed on the first skin and subsequently covered by the second skin.
During the infusion process, the resin passes through the core (in the perforations) to impregnate both skins. Once the process is complete, the adhesion between core and skins is ensured by the “resin nails” that form as a result of filling the holes present in the core.
Inserts of materials other than the core (e.g., wood) can be made provided they are of small dimensions so as not to present an impediment to resin flow.
Laying second skin fabrics (outer skin)
Laying the second skin is an operation entirely similar to that for the inner skin previously described.
Care must therefore be taken to position the fabrics correctly and to hold them in place. The deposition of airborne particles must also be avoided by working in clean areas equipped with appropriate ventilation systems.
In the case of large parts, during fabric laying and core placement, it is important not to step on the material just laid, as this could cause movement that may not be immediately visible.
Laying consumables in the infusion process
After completing the laying of all materials specified in the lamination plan, the phase of positioning the consumables begins. There are several methodologies that differ in some technical aspects while maintaining a common operating principle. In general, it is necessary to position in all cases some vacuum channels connected to one or more vacuum pumps must be positioned.
These vacuum channels usually run along the outer perimeter of the mold and then connect to the vacuum pumps; in the case of parts with modest dimensions, it is also possible to position a single vacuum channel on one side, the one opposite to the resin inlet side of the resin, to create a precise path (front) for the resin.
Resin distribution and channel configuration
In infusion, the fabrics and core are impregnated with resin due to the vacuum created between the mold and the vacuum bag. The resin is therefore drawn by this vacuum and, through appropriate tubing, flows from the resin drums catalyzed or from the external mixing machine to the mold and then flows along the entire surface of the part.
For this to occur, distribution paths for the resin in the part must be planned; different infusion processes provide different approaches to solving this.
While some methods provide for the resin to flow in channels formed by grooves cut into the surface of the core (grooving), other infusion methods provide for the flow of resin in channels not cut into the core (core material) but provided above the outer skin.
In this case, the cores have only perforations while the two faces are smooth, and the resin flows along spaced channels depending on the complexity of the surface and then spreads through a wide-mesh net that is laid over the entire part above the second skin (the flow mesh).
In general, distribution channels consist of spiral tubes made of plastic material which simultaneously allow the resin to flow out and prevent the collapse of the channel, thus avoiding the interruption of the resin flow. Similarly, the wide-mesh net (drainage mesh) allows for a minimum space to be maintained between the laminate and the vacuum film in which the resin flow can move. SAERflow®, a fiberglass fabric, was created specifically for this purpose.
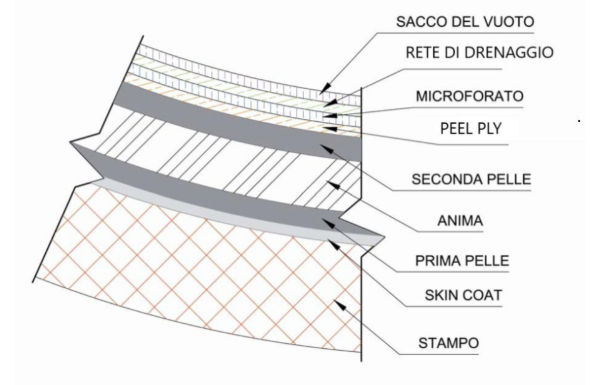
Peel ply, perforated film, and vacuum bag
Before laying the drainage mesh, however, the peel ply or the drainage mesh is applied with the addition of the perforated film; finally, the vacuum bag is positioned.
The peel ply is a polyamide or polyester fabric that creates a barrier between the laminate and the overlying layers, preventing the resin from involving them. The removal of the peel ply therefore also results in the detachment of the drainage mesh and the vacuum film.
Since peel ply is designed to achieve a rough laminate surface for secondary operations such as painting or bonding, efforts have been made to avoid excessive use of this product by using only the perforated film + the drainage mesh.
The perforated film is a very thin layer of plastic material uniformly perforated, capable of allowing air to pass from the lower layers to the upper ones. Being a release product, the removal of the drainage mesh and the vacuum film is very simple.
In solutions for the industrial market, Mascherpa also offers innovative heat-shrink films and peel plies from Diatex, designed to ensure process control, surface quality, and reliable release during infusion.
Vacuum bag sealing and tacky tape
It is now necessary to prepare the vacuum film (or bag), which is effectively secured to the mold along its entire perimeter by means of a flange (technical area) that must always be present in molds used for the infusion process.
The contact surface between the mold and the vacuum bag, i.e., the flange, must be in excellent condition and perfectly clean; in this area, the vacuum bag must adhere perfectly to the mold to prevent the passage of air from the outside.
The vacuum bag is effectively fixed to the mold flange, which runs along its entire perimeter, by means of a double-sided tape made of high-thickness butyl material commonly called “tacky tape“. This tape is adhesive on both sides:
- one side of the tape adheres to the mold;
- the other side adheres to the vacuum bag.
The high thickness of the tacky tape and its workability allow for the creation of a barrier against the ingress of air from the outside.
It is important to note that the creation of the vacuum necessary for the success of the infusion process depends on the correct positioning of the tacky tape; it must adhere well to the bag and the flange, so as not to create vacuum “leak” zones.
Furthermore, the vacuum bag must be laid out with extreme care, avoiding stepping on it or damaging it during positioning; in fact, it is very easy to cause tiny holes that are difficult to see but capable of making the attempt to create the right vacuum futile.
It is also important to use a vacuum bag consisting of a single piece avoiding the assembly of multiple parts. There are commercially available vacuum bags of large dimensions suitable for most manufactured items.
The layout of the vacuum bag must obviously encompass the suction channels connected to the vacuum pumps; it should also be considered that once the vacuum is created, the bag will adhere forcefully to the mold. Therefore, it is necessary to provide a sufficiently large film to allow for complete adhesion without creating tensions that could tear it, ruining the process.
However, it should be remembered that even exceeding in the opposite direction, i.e., using a very large vacuum bag, could create very dangerous localized accumulations of resin. In general, the surface of the vacuum bag should be slightly larger than the developed surface of the mold.
Creating and monitoring the vacuum level achieved
When the positioning of the vacuum bag is also completed, the vacuum pump connected to the suction channels can be turned on.. This operation must be performed with the shut-off valves for the resin flow closed to prevent the infusion from starting prematurely.
When the vacuum pump is running, the air present between the vacuum bag and the mold flows outward and the bag presses against the mold. The time to create the right vacuum varies depending on the size of the item and the power of the pump; for large-scale infusions, multiple pumps are sometimes necessary, which also provide a safety element in case one of them fails during the process.
It is advisable to use only vacuum pumps specifically built for this purpose. The vacuum level obtained must be monitored through gauges, commonly called “vacuum gauges or manometers“, which must be placed at various points, away from the suction channels.
The gauges consist of a needle indicator that moves on a graduated scale and a suction cup that must be effectively fixed to the vacuum bag after making a small hole. One will observe the vacuum level indicated by the gauges increase and then stabilize at a value that essentially depends on the power of the pump and the effectiveness of the system.
It is not possible to indicate a pressure value to be reached that is valid for all cases, but we can refer to a minimum value of 0.4 bar and an optimal value of 0.55 bar that is desirable to obtain.
Once the maximum vacuum value is reached, it is necessary to maintain it for a sufficiently long time to ensure that the system is stable; 15 to 30 minutes is recommended, during which there should be no significant fluctuations in pressure. This operation can be performed using “sniffers“, which are microphones capable of perceiving the hiss that air produces when it passes through a small hole.
It is important not to start the infusion process until you are absolutely certain of the effectiveness of the vacuum obtained, as the infusion process is not reversible.
Resin infusion and process control
The next phase is the resin infusion; once certain that the previous operations were successful, it is possible to open the shut-off valves along the infusion lines and allow the resin to pass from the storage tanks to the mold.
Before being infused, the resin must obviously be catalyzed to allow the curing process to begin. The catalyst time of the resin depends essentially on the temperature it is at and the type of resin and catalyst. This time interval, from the moment the resin is combined with the catalyst to the moment it passes to the solid state, is also called “gel time“.
In fact, it must be considered that the resin flow takes a certain amount of time to spread over the entire surface to be impregnated, depending on:
- the size and shape of the manufactured item;
- the method used;
- the vacuum level reached;
- the physical characteristics of the resin;
- the air temperature.
It is necessary to be aware of all these factors before proceeding with the infusion.
The gel time must therefore be longer than the time required to infuse the entire part, also allowing for an appropriate safety factor. To achieve the correct gel time, additives are often used that increase or decrease this time (accelerators or retarders).
Managing Infusion Channels
It should also be noted that a sufficient quantity of resin stored in the tanks must be provided to prevent it from running out before the process is complete.
The tanks containing the resin (normally the resin drums themselves, properly catalyzed) to be infused must be positioned close to the mold, shortening the paths as much as possible.
It is also necessary to secure the infusion channels effectively to prevent them from moving during the process and disconnecting from the tanks, which would draw in air and compromise the entire procedure.
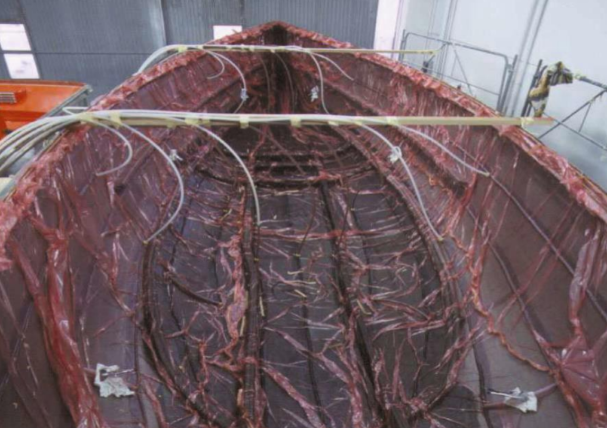
For large parts, multiple infusion channels are typically set up, which are opened at different times in accordance with the planned resin flow path . Typically, an infusion path is planned starting from the center and proceeding toward the perimeter for large parts, or starting from one side and reaching the opposite side, where the vacuum is positioned, for flat panels of smaller dimensions.
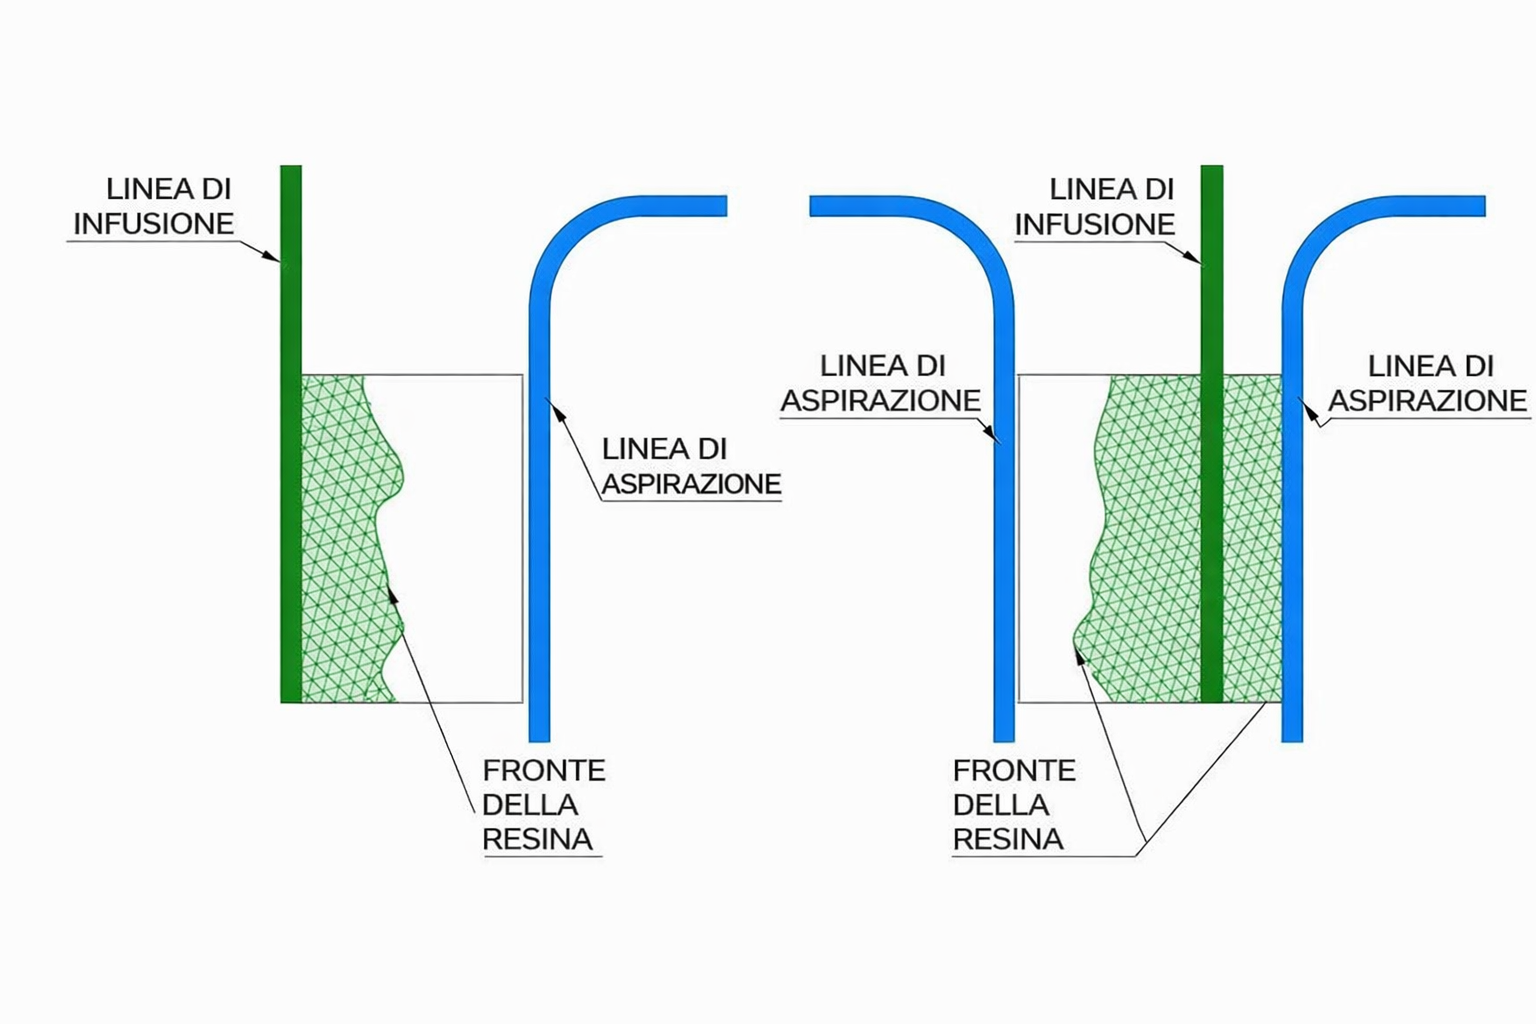
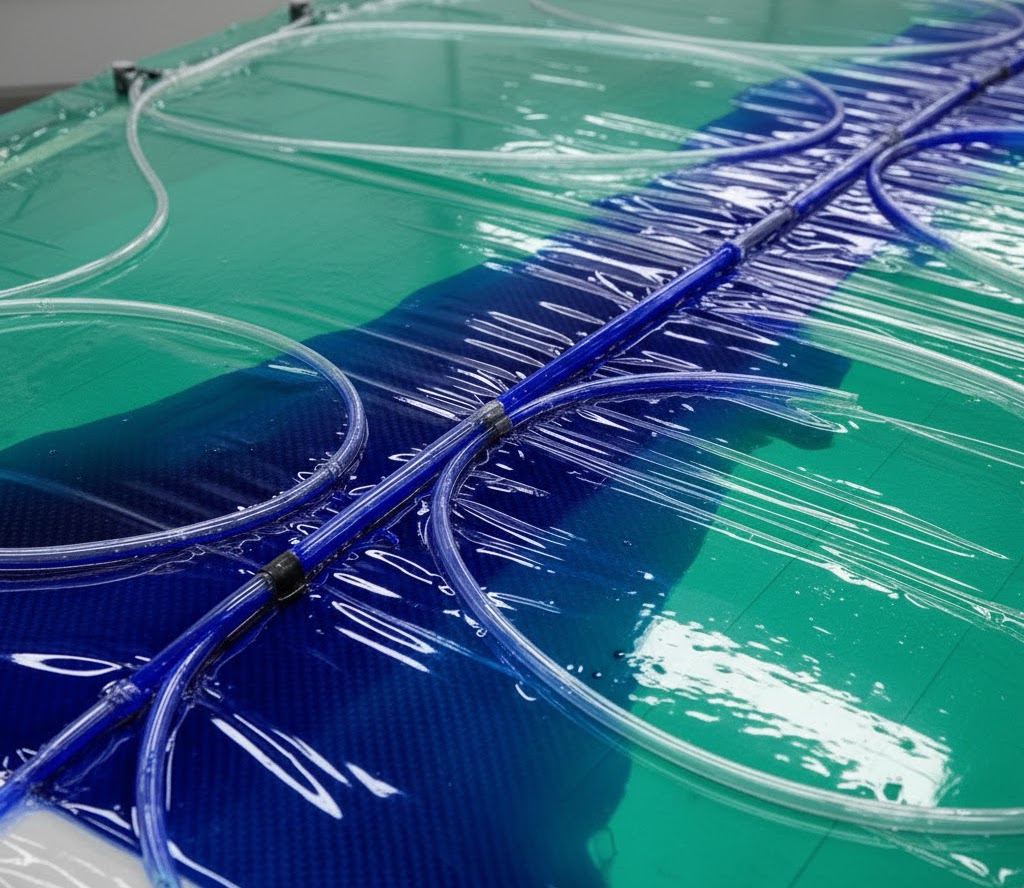
During the infusion process, it is important to monitor the speed of the resin front, which is usually clearly visible beneath the vacuum bag. To do this, simply mark the position of the resin flow front with a marker on the vacuum bag at constant time intervals. The distance traveled between one measurement and the next should then be recorded, thus tracking the variation in infusion speed.
Obviously, the speed will be highest at the beginning of the infusion process and will then gradually decrease to stabilize at a minimum final value. This decrease is also accompanied by a decrease in vacuum pressure registered by the gauges. It is important to ensure that the resin speed does not drop to levels so low that the infusion time exceeds the gel time of the resin.
The process can be considered successfully completed when the entire surface of the part has been reached by the resin. At this point, the shut-off valves of the infusion channels can be closed, followed by the vacuum pump. Closing the shut-off valves must always precede turning off the vacuum pump to avoid excess resin being supplied to the mold due to system inertia.
It is good practice to keep the vacuum pump running with valves closed for the time necessary to complete the transition of the resin to a solid state. This allows the production of compact laminates of superior quality.
Process Completion and Laminate Curing
At this point, the infusion process can be considered complete. However, it should be noted that the resin is not fully cured, even though it is already in a solid state, and therefore a period of time ranging from 6 to 24 hours must elapse before the vacuum bag can be removed along with the breather and peel ply to reveal the laminate.
Gelcoat and Skin Coat: Aesthetic and Structural Function
The gelcoat is a resin-based product used to create a high-quality outer surface of the part that is ready to be painted. The Gelcoat is applied with a roller or brush and, in the case of hulls or decks, also serves to create a protective barrier against external agents.
The skin coat typically consists of two layers of manually laminated mat and is used to prevent visible overlaps of the fabrics or their weave on the outer surface of the part, commonly called “print-through. In particular, with the infusion method, the fabrics are compressed by the vacuum bag, and therefore “print-through” is particularly evident. It is therefore recommended to use a skin coat consisting of at least two layers of 450 mat.
The skin coat also has the structural function of dissipating minor impacts that the vessel may encounter. The mat fibers, not being permanently bonded to each other, are able to absorb impacts, protecting the underlying laminate.
What Are the Applications of the Vacuum Infusion Process
Vacuum infusion is applied in various industrial sectors where it is essential to produce composite material components of large dimensions, lightweight, and with high strength. The main applications are as follows:
- Aerospace Industry: vacuum infusion is used to produce important structural components such as composite aircraft wings, struts, and other critical primary structures. This method is preferred for its ability to produce lightweight, high-load-capacity parts, essential in aerospace applications.
- Marine: in the maritime sector, vacuum infusion is particularly suitable for manufacturing large components such as hulls and decks. The process enables the production of complex-shaped products with excellent mechanical properties, making it an ideal choice for this field.
- Wind Energy: the wind energy sector actively uses vacuum infusion for the production of wind turbine blades. This process ensures high-quality production, which is critical as blades increase in length and require high structural integrity.
- Automotive: although not explicitly mentioned in the materials, the automotive industry also benefits from vacuum infusion technology, which can be used to produce structural components and panels requiring a high strength-to-weight ratio.
- Industrial Applications: vacuum infusion is also used to mold large structural parts such as bridges, railway platforms, and other large industrial components. The process is valued for its cost-effectiveness and the high strength-to-weight ratio of the components produced.
From Theory to Practice: The Case of the Alba Skiff
The infusion process is not just a methodology described at a theoretical level, but a technology applied concretely in real high-performance projects. A significant example is the construction of the Alba skiff, developed by the Revel Sailing Team as part of the Mascherpa NEXT program.
In the construction of Alba, vacuum infusion played a central role in ensuring both structural quality and compliance with the sustainability requirements imposed by the university competition 1001VELAcup. Mascherpa supported the team in the technical discussion on composite materials, supporting the students’ choices and sharing its know-how with them.
The project coherently integrated materials, sandwich structure, and infusion process:
| Product | Description |
| Saertex® flax fiber fabrics (X-F-420 g/m²) | main reinforcement of the hull, chosen for drapability and wettability |
| Saertex® glass fiber fabrics (X-E-444 g/m²) | structural integration to improve mechanical strength and stability. |
| Saertex® carbon fiber fabrics (X-C-406 g/m²) | used in the appendages to increase stiffness and reduce weight. |
| 3DCore® GR HX 75 in recycled PET | core material for the sandwich structure, designed to increase stiffness and promote proper resin flow. |
| Huntsman Araldite® LY 5052 MBC® | bio-based epoxy resin with low viscosity. |
| Structural adhesives Araldite® 2015-1 and Araldite® 2051 | bonding and assembly of composite material components. |
| Diatex® consumables | control of resin flow, compaction, and laminate quality. |
The result is a lightweight hull produced through a controlled infusion process, in which every element—from reinforcement to core, from resin to consumables—contributed to the final quality.
The Alba project represents a concrete application of how the infusion process, when supported by informed material selection and structured technical discussion, can translate into a real high-performance solution.


Mascherpa Integrated Solutions for Composite Materials
The infusion process is not a simple operational sequence but an integrated system in which resins, reinforcements, core materials, and consumables must work coherently.
Mascherpa supports designers and manufacturers in selecting the most suitable solutions, providing a complete portfolio of composite materials, application technical support , and cross-functional expertise on processes such as infusion, RTM e lamination.
The goal is not to supply a single product, but to ensure continuity, control, and quality throughout the entire production cycle of composite materials.
This vision will also be central to Mascherpa’s presence at JEC World 2026, the leading international event dedicated to composite materials, an opportunity for technical discussion on processes, applications, and integrated solutions.
For more information on Mascherpa solutions for composites or to obtain a free ticket to the exhibition, complete the dedicated form.